
I'm so excited to announce Chibitronics collaboration with Lawn Fawn in creating a limited-edition kit, Charge Me Up for Chibitronics! This kit contains cute robot stamps and coordinating die, patterned paper, Chibitronics LED stickers, copper tape, and templates, so you can create glowing cards very easily.
We will also be giving away a kit to one lucky commenter each day so make sure to hop along Chibitronics blog and all the inspiration stops for a chance to win!

I posted a very simple card on Chibitronics blog.
You Charge Me Up Card

Let's Charge Together Card

Here, I will show you how to make a pull-tab card using the robot stamp included in the kit.

When you pull the tab, the left robot move and the LEDs flash alternately.
I will make the parts referring to the picture below.

- 5 1/2" x 8 1/2" mermaid cardstock.
- Stamp the gear stamps using four color inks onto white cardstock size 3 3/4" x 5". Die cut using slit and speech bubble dies.
- White cardstock size 3 3/4" x 5". Die cut using slit die.
- 3 3/4" x 5" sea foam patterned paper. Die cut scalloped frame die.
- Stamp robot, present and balloon onto white cardstock. Color with Copic markers and die cut using coordinating dies.
- Stamp the sentiment and speech bubble on white vellum.
- Die cut white cardstock using Lawn Fawn pull tub die set.
- Die cut the paper using small tab and sleeve dies.
~Make the circuit~

- Mark the position of the Chibitronics and the battery.
- Draw the circuit with a pencil.
- Apply the double-sided tape on the battery place.

- Stick the copper tape on the pre-drawn path.
- At the battery place, peel off the release paper, stick the negative side copper tape, fold it back and cut it.
- Stick the positive side copper tape.
- At the position of the battery leave the positive side copper tape about 1 inch and cut it.
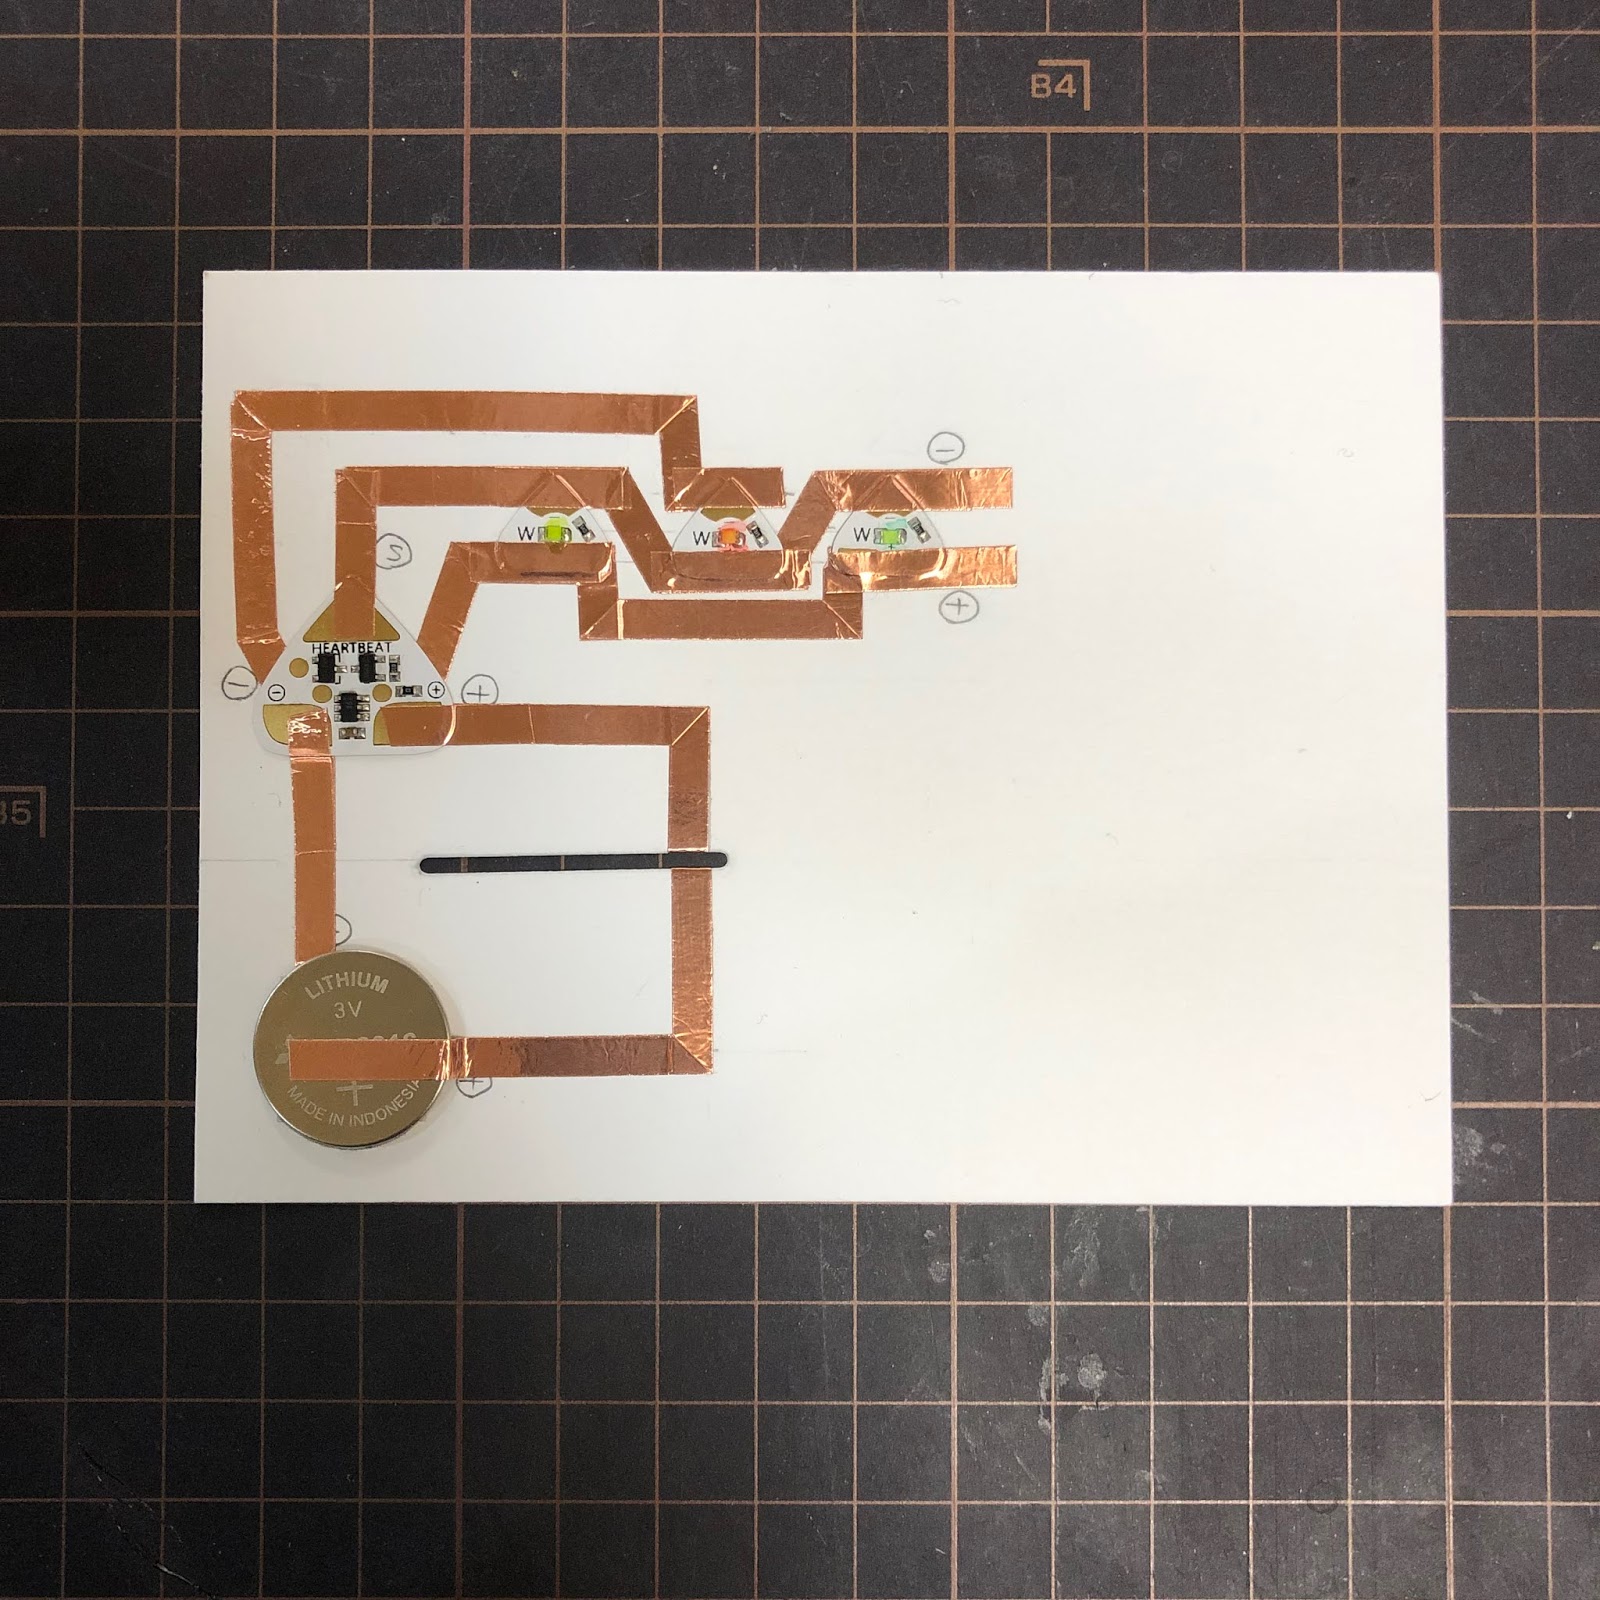
- Place the battery on the copper tape with positive side facing up and stick the positive side copper tape on the battery.
- Attach the white LEDs and effect add-on sticker to the copper tape, over the outline.
- Stick short copper tape on the edges of the LED and effect add-on sticker to reinforce.
- Color the LEDs using Copic markers.
When you color the LED, you can change the white LED to pale color.

Make a pull tab switch referring to this article.

~Make the cover panel~

- Stick vellum paper on the back of the cover panel.
- Insert the switch part from the back of the slit of the cover panel.
- Stick the robot part on the flap.
- Stick the other robot parts and balloons on the cover panel.
Attach tape glue to another pull tab part. Stick two pull tab parts together.

- Pass the sleeve through the back side of the pull tab and stick it on the cover panel.
- Attach the tape glue inside the tab of the sleeve. Stick them together so as to wrap around the pull tab.
Stick the foam tape around the entire edge of the back side of the cover panel.

Insert the switch part into the slit of the card base.

Put the double-sided tape on the back of the card base.

Stick the cover panel on the folded mermaid cardstock. Stick the small part on right end of the pull tab. Stamp the sentiment on the pull tab.

I finished it!
When you pull the tab, the left robot move and the LEDs flash alternately.
Thank you for stopping by!
And next stop is Lesley.


Love your cards! And your tutorial is great! Thanks for sharing :)
返信削除Awesome card! It looks hard to make, but I'm sure that if I follow your instructions, I might be able to do something.
返信削除Wow! Your card is really adorable!! Love the cute sentiment pull you've added and thank you for sharing the details!
返信削除Awww!!! Adorable and sweet cards!!! Love this kit!!! Thank you for your step by step tutorial!!!
返信削除Really impressive card that you made :)
返信削除Adorable cards! Love this fun kit!
返信削除