
Today I make light up tag book using Chibitronics and Karen Burniston Tag Book Pop-up die.

"Karen Burniston Tag Book Pop-up die"

"Waffle Flower Crafts Rock On Stamp Set"
"Waffle Flower Crafts Rock On Matching Die"


What you need to make a light up card is like this.
"Chibitronics Pink, Orange, and Green LED Sticker Pack"
"Chibitronics Red, Yellow, and Blue LED Sticker Pack"
"3V coin cell battery (CR2025)"
"5mm wide Copper tape"
"Conductive Fabric Tape Patche"

I'm using these supplies.
"Yellow, White, Light green cardstock"
"White vellum paper"
"2mm thick yellow foam sheet"

"Lawn Fawn Dandelion Line Dance 12 inch paper"
"Chibitronics Pink, Orange, and Green LED Sticker Pack"
"Chibitronics Red, Yellow, and Blue LED Sticker Pack"
"3V coin cell battery (CR2025)"
"5mm wide Copper tape"
"Conductive Fabric Tape Patche"
I'm using these supplies.
"Yellow, White, Light green cardstock"
"White vellum paper"
"2mm thick yellow foam sheet"
"Lawn Fawn Dandelion Line Dance 12 inch paper"

I will make the parts referring to the picture below.

- Four yellow tags.
- Two tags of pattern paper.
- One tag of yellow foam sheet.

- Two yellow pop-up mechanism parts.
- Four yellow pop-up mechanism parts.
- One yellow hinge part.
- Two white small tags and square parts.
- Die cut white cardstock using scalloped frame die.
- Die cut light green cardstock using grass border die.
- One yellow pull tab part. (0.5 x 2.5 inch)
- Three switch parts. (0.5 x 0.5 inch)
- Six white vellum paper parts.
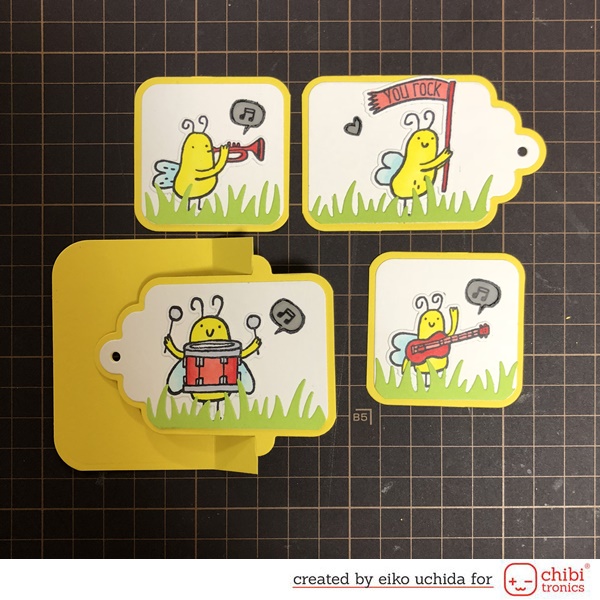
Stamp six bugs onto white cardstock and color the bugs with Copic markers.
(Y02, Y06, B000, B00, R32, R35, C0, C2)
Die cut the bugs using the coordinating die.

Adhere the grass borders and bugs using
adhesive runner.


Adhere the decorative parts onto yellow
tags.


Put the decorative parts on the tag and
mark the lights.

Draw a line 1/2 inch from the edge of the pattern paper tag and cut.

Folding the hinge part along the score
line.

Make a switch mechanism.

- Draw a line 1/4 inch from the edge of the tag.
- Draw a line at the center of the tag.
- Draw two lines at 1/4 intervals above and below the previous line.
- Draw a line 1/2 inch from the edge of the pull tab and fold along the line.
- Put the line drawn on the left tag and the pull tab, and draw a line along the tip of the pull tab.
- Put the line drawn on the right tag and the pull tab, and draw a line along the tip of the pull tab.
- Draw a line 1/2 inch from the right line.
- Cut the slit with 1 mm width with a craft knife.
- Apply the double-sided tape on the pull tab and adhere it on the tag.
Put the decorative parts on the pop-up
mechanism part and mark the lights.

Assemble the pop-up mechanism parts and make the circuit.

- Adhere two mechanism parts together.
- Fold along the score line.
- Mark the position of the Chibitronics.
- Draw the circuit with a pencil.
- Draw the slit to pass the copper tape to the back side.
- Cut the slit using a craft knife.
Put the pop-up mechanism part on the tags
and mark the slit.

Draw the circuit with a pencil behind the tag.

Adhere the double-sided tape on the
position of the battery. Adhere the copper tape on the drawing path.

At the position of the battery, peel off
the release paper, adhere the negative side copper tape, turn it back and cut
it.
Make the switch parts.

- Fold square parts in half.
- Adhere copper tape around it.
Adhere the pull tab part on the switch
part.

Adhere the square part on the switch part.

Adhere the pattern paper tags on the tag
book.

Adhere the copper tape on the drawing path. At the position of the slit leave a long copper tape.

- Adhere the green, red and orange Chibitronics on the mark.
- Adhere the conductive fabric tape on the hinge.
Adhere copper tape on the Chibitronics to
reinforce.

Adhere the pop-up mechanism part on the tag book.

Pass the copper tape through the slit.

Adhere the copper tape on the drawing path behind the tag.

- Place the battery on the copper tape with the positive side up and adhere the positive side copper tape on the battery.
- Adhere the red and orange Chibitronics on the mark.
Adhere the conductive fabric tape on the
T-junction and the hinge.

Adhere the yellow washi tape on the hinge.

Adhere the foam frame on the tag book.

Stamp the speech bubble onto vellum using
StazOn Jet Black ink.

Adhere vellum paper on the back of the
decorative parts.

Adhere the decorative part on the foam
frame and tag book.

Adhere the decorative parts on the pop-up
mechanism part.

Tie the ribbon through the hole of the tag.

I finished it!
When you open the tag book, the LED glows.

Be sure to check out the whole video tutorial for more details.
Thank you for stopping by!


0 コメント:
コメントを投稿