
Today I make light up Halloween tag using Chibitronics and Tim Holtz stamps and dies. This time I used the Power Pack of Pearblossom Press, so it was super easy to create a glowing tag.
The Power Pack is a battery holder and button switch that allows you to quickly and easily create light up cards without having to build your own switch.
Pearblossom Press sells Power Pack Kit with white Chibitronics LED sticker and copper tape, but this time I want to use the yellow LED, so I use a single Power Pack.

What you need to make a light up card is like this.
Chibitronics Red, Yellow, Blue MegaPack
5mm wide Copper Tape
Pearblossom Press Power Pack

I'm using these stamps and dies.
Tim Holtz Frightful Things die


Tim Holtz Regions Beyond die

Tim Holtz Tag Collection die

Tim Holtz Mini Halloween 4 (CMS198)

Tim Holtz Seasonal Catalog 1 stamp (CMS174)

Tim Holtz Halloween Cutouts stamp (CMS139)

I'm using these papers.
Ranger Mixed Media Cardstock


First I made Halloween pattern paper using Tim Holtz stamps and inks.
Stamp randomly large Halloween background (CMS174), spiderweb and spider(CMS139), small script (CMS198) with shadow grey, watering can and coffee Archival Ink respectively.

I'm using these Archival Inks.
Archival Ink shadow grey, watering can, coffee

Add color with carved pumpkin, crushed olive, squeezed lemonade, milled lavender Distress Marker.

Color the paper with dried marigold, milled lavender, old paper, black soot Distress Ink.
Pearblossom Press sells Power Pack Kit with white Chibitronics LED sticker and copper tape, but this time I want to use the yellow LED, so I use a single Power Pack.
What you need to make a light up card is like this.
Chibitronics Red, Yellow, Blue MegaPack
5mm wide Copper Tape
Pearblossom Press Power Pack
I'm using these stamps and dies.
Tim Holtz Frightful Things die
Tim Holtz Ghost Town die
Tim Holtz Regions Beyond die
Tim Holtz Tag Collection die
Tim Holtz Mini Halloween 4 (CMS198)
Tim Holtz Seasonal Catalog 1 stamp (CMS174)
Tim Holtz Halloween Cutouts stamp (CMS139)
I'm using these papers.
Ranger Mixed Media Cardstock
First I made Halloween pattern paper using Tim Holtz stamps and inks.
Stamp randomly large Halloween background (CMS174), spiderweb and spider(CMS139), small script (CMS198) with shadow grey, watering can and coffee Archival Ink respectively.
I'm using these Archival Inks.
Archival Ink shadow grey, watering can, coffee
Add color with carved pumpkin, crushed olive, squeezed lemonade, milled lavender Distress Marker.
Color the paper with dried marigold, milled lavender, old paper, black soot Distress Ink.


Cut two pieces of pattern paper using a large tag die. Cut plain paper and 3mm thick foam sheets. Color the entire edge of the plane tag with black soot Distress Ink.

Die cut the Classic Kraft paper with ghost, moon, skull, pumpkin, tree, house and candle die. Then color these with Alcohol Pearl.


Stick the Design Tape randomly on the patterned tag. Place the motifs on it and cut out the windows and pumpkin face.

Put the decorated tag on the plane tag, mark the position of the LED and Power Pack.

Make the circuit. Mark the position of the Chibitronics and the Power Pack. Draw the circuit with a pencil.

Stick the copper tape on the pre-drawn path.

Apply strong adhesive tape to back of Power Pack (apply only over logo area, avoid getting adhesive near the silver tabs, as it may not allow electricity to flow between your circuit path and the Power Pack).

Adhere Power Pack to tag with positive and negative tabs correctly lined up.

Stick the copper tape on the silver tab of Power Pack to the copper tape circuit path. Stick yellow LED sticker on top of the copper tape.

Stick short copper tape on the edges of the LED to reinforce. Push button on Power Pack to test lights.

Assemble the tag. Stick the vellum behind the decorated tag.

Stick the foam sheet tag on the circuit tag.

Stick another patterned tag behind the circuit tag.

Stick the decorated tag on the foam sheet tag.
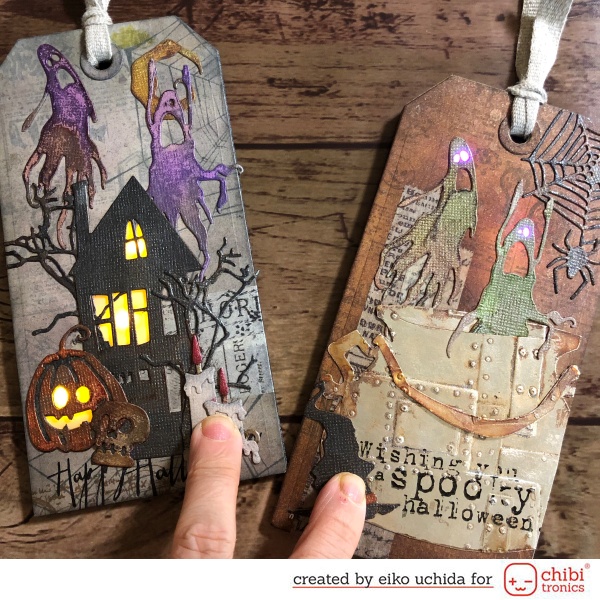
Finished! When you push the candle, the windows and pumpkin face glow.


I make one more tag using effects Add-on sticker. What you need to make a light up card is like this.
Chibitronics Pink, Orange, Green MegaPack
Chibitronics Circuit Stickers Effects Add-On + Stencil
5mm wide Copper Tape
Chibitronics Pink, Orange, Green MegaPack
Chibitronics Circuit Stickers Effects Add-On + Stencil
5mm wide Copper Tape


Tim Holtz Tim Holtz 3D Foundry embossing folder


I'm using antiqued bronze and brushed pewter Distress Mica Sprays


I made Halloween pattern paper using Tim Holtz stamps and inks.
Stamp randomly large Halloween background (CMS174), spiderweb and spider(CMS139), small bottles (CMS198) with potting soil, shadow grey and watering can Archival Ink respectively. Color the paper with dried marigold, milled lavender, antique linen and ground espresso Distress Ink. And then spritz the paper with antiqued bronze and brushed pewter Distress Mica Spray.
Stamp randomly large Halloween background (CMS174), spiderweb and spider(CMS139), small bottles (CMS198) with potting soil, shadow grey and watering can Archival Ink respectively. Color the paper with dried marigold, milled lavender, antique linen and ground espresso Distress Ink. And then spritz the paper with antiqued bronze and brushed pewter Distress Mica Spray.

Die cut the silver metallic paper with cauldron die. Emboss with 3D foundry embossing folder. Then color with smolder and mineral Alcohol Pearl.

Die cut the Classic Kraft paper with ghost, spiderweb, spider and witch hat die. Then color these with Alcohol Pearl.


Stick the Design Tape randomly on the patterned tag. Place the motifs on it and cut out the ghost eyes.

Make the circuit.

- Mark the position of the Chibitronics and the Power Pack.
- Draw the circuit with a pencil.
- Stick the copper tape on the pre-drawn path.
- Apply strong adhesive tape to back of Power Pack and adhere Power Pack to tag with positive and negative tabs correctly lined up.
- Stick the copper tape on the silver tab of Power Pack to the copper tape circuit path.
- Stick pink LED sticker on top of the copper tape.
Stick short copper tape on the edges of the LED to reinforce. Push button on Power Pack to test lights.

Assemble the tag.

- Stamp the sentiment (CMS307) on the cauldron with piano black StazOn Pigment.
- Stick the foam sheet tag on the circuit tag.
- Stick another patterned tag behind the circuit tag.
- Stick the vellum behind the decorated tag.
- Stick the decorated tag on the foam sheet tag.
When you push the witch hat, the ghost eyes flash.


If you like cute Halloween than spooky Halloween, how about this tag?

I made a tag with the same composition as the Tim tag using Lawn Fawn stamps and dies.


~Supplies List~
I made a tag with the same composition as the Tim tag using Lawn Fawn stamps and dies.
~Supplies List~
- Chibitronics Red, Yellow, Blue MegaPack
- 5mm wide Copper Tape
- Pearblossom Press Power Pack
- Lawn Fawn build-a-house die
- Lawn Fawn build-a-house Halloween add-on die
- Lawn Fawn happy haunting stamp
- Lawn Fawn happy haunting die
- Lawn Fawn spooktacular stamp
- Lawn Fawn spooktacular die
- Lawn Fawn black licorice cardstock
- Lawn Fawn storm cloud cardstock
- Lawn Fawn pearlescent vellum
- Lawn Fawn jet black ink
- Ranger watercolor paper
- Neenah classic crest 80lb smooth solar white paper
- Distress Oxide Ink stormy sky, chipped sapphire, dusty concord
- Distress Mica Sprays
- StazOn Pigment piano black
- Copic sketch Y13, Y15, YR02, YR04, YR07, E33, C3, C5, W5, W7
Thank you for stopping by!


0 コメント:
コメントを投稿