
Today I make light up 3D house using Tim
Holtz's Village Dwelling series die.

I will make two kinds of houses, basic level which can be easily made and advanced level which requires special materials.
At the basic level house, the window glows when you pull the pull tab.
At the advanced level house, the window flashes and the music rings when you turn on the switch.
I will make a basic level house this time.

I'm using Tim Holtz's village dwelling and
village winter dies.


I'm using 80 lb and 110 lb Neenah white cardstock and white vellum paper.
And using these papers and plastic sheet.

"Tim Holtz kraft-core nostalgic collection"
"Frosted plastic sheet"

What you need to make a light up card is like this.
"Chibitronics Pink, Orange, Green MegaPack"
"Chibitronics Red, Yellow, Blue MegaPack"
"3V coin cell battery" (CR1616)
"5mm wide Copper tape"

I will make the parts referring to the picture below.


"Chibitronics Pink, Orange, Green MegaPack"
"Chibitronics Red, Yellow, Blue MegaPack"
"3V coin cell battery" (CR1616)
"5mm wide Copper tape"
I will make the parts referring to the picture below.
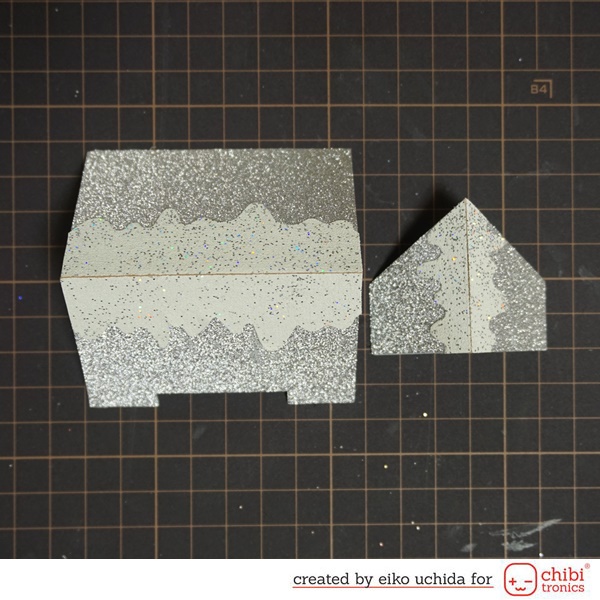
- Die cut the 110lb and 80lb white cardstock with wall structure dies.
- Die cut a 110lb white cardstock with roof, base and chimney.
- Die cut a ideaology deco sheet with base, roof and base of porch dies.
- Die cut a corrugate cardboard with chimney, additional door and posts for the front porch dies.
- Die cut a white Kraftcore cardstock with snow drips dies.
- Die cut a red Kraftcore cardstock with window frame die.
- Die cut a frosted plastic with icicle dies.
- Make pull tab parts with white cardstock.(two 0.5x0.5 inch, two 0.5x2 inch)
- Cut the white vellum paper for the window.
Cut off the tab of the wall structure part
of 80 lb.
Put the wall parts on the white cardstock
and trace the outline.
Mark the center of the window and cut the outline with a craft knife.
Fold at the score line and cut off the door.
Draw a line for the slit at the left end.
Mark and cut out the 1/32 x 1 inch slit.
Mark the position of the battery and the Chibitronics.
Draw the circuit with a pencil.
Adhere a double-sided tape at the position
of the battery.
Adhere the copper tape on the drawing path.
In the position of the battery, adhere the
copper tape on the double-sided tape.
Place the battery on the copper tape with
the negative side up.
Adhere the negative side copper tape on the
battery.
Adhere the red and green Chibitronics LED
sticker on the mark.
Make a switch part.
- Make two small square parts with white card stock. Fold square parts in half.
- Insert the switch into the slit and adhere the copper tape to the same position as the copper tape attached to the circuit paper.
- Adhere the copper tape around the switch part. Make cross-shaped parts like this.
- Insert the switch part into the slit again.
Adhere the pull tab parts on the switch
parts.
The back side is like this.
Adhere a foam tape on the circuit card
base.
I will make the wall of the house.
I'm using a ranger texture paste and stencil.
Apply the iced spruce distress ink to my
craft sheet and mix the texture paste with a palette knife.
Adhere the wall parts on craft sheet with
temporary adhesive tape.
Place a stencil on the part and scrape the
texture paste through a stencil.
Make four wall parts the same way and air
dry.
After dry, apply the hickory smoke distress ink onto the parts using the ink blending tool.
Color the corrugate parts in the same way.
Adhere the snow drip parts on a copy paper
with temporary adhesive tape.
Heat embossing the parts with the snowflake tinsel embossing powder.
Adhere the roof part of the deco sheet on
the roof part of the cardstock.
Adhere the snow drip part on the roof part.
Adhere the corrugate parts on the cardstock
parts.
I make a front porch and chimney.
Drill a hole in a door part, attach a mini fastener and make a door knob.
Adhere vellum paper on the back of the
windows.
Make a slit for the pull tab.
Adhere the tabs with double-sided tape.
Adhere the wall structure on the base
structure and adhere the window frames and door part on the wall.
Through a pull tab on the slit, adhere the
circuit-attached card base to the house.
It looks like this from the top.
Adhere the front porch and
Adhere the icicle parts on the edge of the
roof.
Adhere the base part of the deco sheet on
the base part of the cardstock and adhere the tabs with paper adhesive.
I finished it!
When you pull the pull-tab, the windows glow.
Do you understand how to make it?
Be sure to check out the whole video tutorial for more details.
Please enjoy the glowing house in the
upcoming holiday season.
Next time I will make an advanced level house.
Don't miss it!
Thank you for stopping by.


Shoot, I thought I left a comment but now I don’t see it. Well, I can tell you it was full of exclamation marks!!! I LOVE, love, love your switch idea! So smart, so neat, and so much more dependable. I seriously can’t wait to try it myself, and think this will be how I make all my cards from now on. You’re a genius! And your house is simply adorable! Wonderful post with fabulous instructions. Thank you, thank you!!!
返信削除