It’s collaboration week with Chibitronics and Lawn fawn!
We are planning to giveaway so please look forward to it.
The details of giveaway is at the bottom of this post.
Today I make this rainbow thanks card.
"love letters"
"love letters lawn cuts"
"embroidered thanks"
Frame dies are here.
"fancy scalloped rectangle stackables"
"large stitched oval stackables"
What you need to make a light up card is like this.
"Chibitronics Pink, Orange and Green LED Stickers Pack"
"Chibitronics Red, Yellow, and Blue LED Sticker Pack"
"3V coin cell battery"(CR2016 or CR2032)
"5mm wide Copper tape"
"Neenah 80lb smooth solar white card stock"
"Lawn fawn rainbow pack cardstock"
"Lawn fawn perfectly plaid rainbow petite paper pack"
"White vellum paper"
The used inks and markers are here.
"Tsukineko memento tuxedo black"
"Copic sketch markers E35 E31 C1 C3 R35 Y15 Y17 YR07"
I'm die cutting white and black licorice cardstock with a largest fancy scalloped rectangle die.
I'm die cutting a perfectly plaid rainbow cardstock with a largest fancy scalloped rectangle die and a second largest stitched oval die.
I'm stamping two chicks, ink and pen stamps with tsukineko memento tuxedo black ink.
I'm going to color with Copic markers.
I'm painting the chick with Y15 Y17, YR07, the ink with C1, C3, R35 and the pen with E31, E35, C1.
I'm die cutting all these images using their coordinating dies.
I'm putting a pattern paper frame on the black cardstock, place chicks and embroidered thanks die.
I'm die cutting a black cardstock with embroidered thanks die.
I'm putting black cardstock on white cardstock and marking my lights with a pencil.
I marked six places.
I'm marking my battery.
I'm marking the position of the right chick.
I'm marking 7/8 inch square.
I'm using a small rectangular paper to make switch.
(The size is 1 3/4inch x 7/8 inch.)
And drawing the circuit with a pencil.
(How to make basic circuit is here.)
I'm adhering the copper tape on the drawing path.
I'm using bone folder to smooth all the copper path.
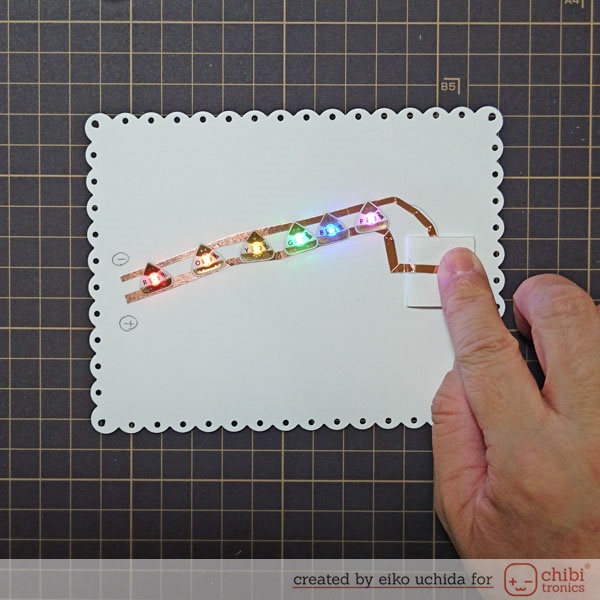
I'm adhering Chibitronics LED stickers.
From the left, red, orange, yellow, green, blue, pink.
Take a look at the battery's signs and place it in the switch.
I'm using a 3V coin cell battery. (CR2016 or CR2032)
When I close the switch, the LED turn on.
I'm adhering the scotch tape on the LED stickers to reinforce it.
To keep in place the battery, I'm adhering foam tape all around it and around the card base.
I'm using a 3mm thick adhesive foam tape.
Ajust the height of the foam tape is higher than the battery.
I'm adhering vellum paper on the back of the black cardstock.
Adhering the cover panel and pattern paper frame to the card base.
I'm adhering everything to the cover panel using thin foam tape.
Finally, adhering the cover panel to the card base.
I'm using a Lawn fawn mermaid cardstock.
I finished it!
Be sure to check out the whole video tutorial for more details.
The collaboration period between Chibitronics and lawn fawn is from 22nd to 24th May.
There is also a plan to giveaway, please join us.
Lawn fawn is giving away a 30 dollers gift card to one lucky commenter and Chibitronics is giving away a starter kit to another lucky commenter.
Winners will be randomly drawn from comments left on the blogs.
The more comments you leave, the better your chances so make sure to stop by and check out all the projects!
The deadline is 23:59 EST on May 28th, 2017.
Related blog post is below.↓
Jessica Frost-Ballas
Lesley Oman
Kelly Griglione
Kelly Szafron
Tiffany Au
Wei Wei Wang
Christina Hsu
Maya Isaksson
Vanessa Amann
Eiko Uchida (here)
Lawn Fawn + Chibitronics Day One
Lawn Fawn + Chibitronics Day Two
Lawn Fawn + Chibitronics Day Three


Wauw absolutely amazing!!! Love the whole design and the rainbow lights are absolutely gorgeous. Such a beautiful card💖💖
返信削除This is amazing card!!!6色のライトが光ったところは圧巻!写真や動画の内容がとてもわかりやすくて、チビトロを使ったカード作りが一気に広がりそうだね!応援しています!!(日本語でのコメントで大丈夫だったかな?)
返信削除I totally need these new light colours, I only have RGB
返信削除I like that you used the vellum to help disperse the lights. Great idea!!!
返信削除Wow, you've done it again! You are definitely the most crafty and dedicating person I know. Thanks for sharing your brilliant ideas and designs!
返信削除Love your card design, the lights add sooo much!
返信削除Beatiful card, love that the rainbow lights don't overpower the cute birdies on the front.
返信削除This card is so cute! I love it!
返信削除すっごくかわいいです! トロピカルカラーのチビトロニクスもあるんですね♪ Eikoさんのブログは、いつも発見と驚きにあふれてます。
So very creative
返信削除Thanks for sharing this great card
I love these little colored lights. Cute idea.
返信削除What a sweet card! So creative reminds of the Lite Brite toys we had growing up ; ) Thanks for sharing all of the details!!
返信削除Very clever idea with the chick painting the lit up sentiment.
返信削除Love that fabulous rainbow of lights!!
返信削除Wow! Great collaboration!!! I’m in love for your adorable card!!! Too cute!!!
返信削除Too cute and so fun!
返信削除Love the colors of
the lights.
Carla from Utah
Absolutely adorable card! Love the addition of the lights to make the card extra special! The stamps you used are so sweet... love the birds!
返信削除This is such a fun card, really cute too
返信削除Very cute care.
返信削除I immediately saw You tube.
It was very easy to understand with polite commentary.
So clever that the sentiment lights up. I like the rainbow colors too.
返信削除The different colored lights with the
返信削除plaid paper is wonderful.
such a sweet card.
thanks for sharing.
I love the lights illuminating the rainbow of colors! Adorable card!
返信削除So creative! Love the sparkle the lights give it!
返信削除Beautiful colors!
返信削除Thank you for the great video, your card is fantastic!
返信削除I loved watching the video of your process. I had not seen anyone use vellum before to cover the holes where the lights were going to shine through...very nice idea. I like that the vellum softens the intensity of the lights. Your design is very sweet.
返信削除Very nice card!Thank you for the video!
返信削除Love the fun use of these sets! The rainbow lights make the paper so pretty! Great video - thanks!
返信削除Thank you for sharing! The card is adorable and clever!
返信削除Your card is really cute. Love it.
返信削除Your card is so fun! What a great way to use the embroidery die as well! Thank you for sharing.
返信削除Adorable card! Thanks for the in depth instructions.
返信削除I love love love this card!!! I just can't get over the lights!!!
返信削除This card is so cute and colorful! I love the idea of the lights behind the stitched word die. Awesome!
返信削除love the lights behind the word, thanks for showing how you did it!
返信削除Beautiful card! I love it!
返信削除Wonderful idea! Love your card! Suteki!!!!
返信削除This is so cute & clever! I love all the colors & the choice of the "love letter" stamp set. Thank you!
返信削除I love your card and you! Thank you for your great sharing.Your blog is a careful explanation,so that it is easy to understand.colorful and cute!!
返信削除What a wonderful idea. Thanks for sharing
返信削除Wow this is so gorgeous. Thanks for the wonderfully detailed tutorial. You have inspired me to try this out:)
返信削除Wonderful card! Great use of the "Thanks" die! I can't wait to make my own card.
返信削除The fact that it's rainbow colors makes my heart so happy!
返信削除