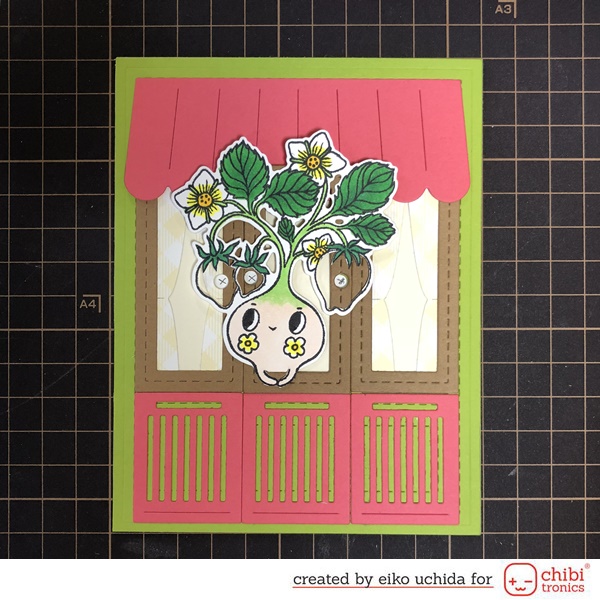
Today I make light up love berry card using Chibitronics and Waffle Flower Crafts stamps and dies.
I used the reed switch on this card. So when you move the magnet closer to the switch, the switch turns on and Chibitronics glows.
Reed switch has two ferrous reeds. When the
reed switch is exposed to a magnetic field, the two reeds inside the switch
pull together and the switch closes. When the magnetic field is removed, the
reeds separate and the switch opens.
I'm using these stamps and dies.
"Waffle Flower Crafts Let Love Grow Combo"
"Waffle Flower Crafts Apartment Builder Die"
"Waffle Flower Crafts A2 Grid Panel Die"
What you need to make a light up card is like this.
"Chibitronics Red, Yellow, and Blue LED Sticker Pack"
"3V coin cell battery (CR2016)"
"5mm wide Copper tape"
"Conductive Fabric Tape Patches"
"Reed switch"
"1/2 inch Super Strong Magnets"
"1/2 inch Washers"
I'm using these papers.
"Lawn Fawn gotta have gingham petite paper pack"
"Lawn Fawn cardstock in vanilla malt"
"Lawn Fawn cardstock in paper bag"
"Lawn Fawn cardstock in cilantro"
"Lawn Fawn cardstock in guava"
"White vellum paper"
"White cardstock"
"Black cardstock"
I will make the parts referring to the picture below.
- 4.25x11 inch vanilla malt cardstock
- 4.25x5.5 inch vanilla malt and white cardstock
- Die cut cilantro cardstock using grid panel die.
- Prepare the parts using the apartment builder die.
- Stamp the strawberry, flower and butterfly onto white cardstock.
- Stamp the strawberry onto vellum paper.
- Stamp the sentiment onto black banner part and heat embossing with white embossing powder.
Color the motifs with Copic markers.
(G05, G17, YG06, Y06, Y17, R000, BG13, BG49, V15, V17, V000, 100, YR02, YR07, E39)
Cut out the strawberries with a craft knife. Die cut the motifs using the coordinating die.
Adhere the apartment parts on the vanilla malt cardstock.
- Cut the middle bar of the grid.
- Adhere the grid panel on the vanilla malt cardstock.
- Adhere the pink parts on the grid panel.
- Adhere the curtain part on the window frame.
- Adhere the window frame on the grid panel.
Place the strawberry motif on the window
frame.
Cut the brown and cilantro frames along the pencil line.
Put the cover panel on white cardstock and
mark the lights with a pencil.
Mark the position of the switch.
Make a switch at the leaf on the upper
left.
Draw a 1/2 inch line.
Mark the position of the battery and Chibitronics.
Place the switch in the middle of the
positive side circuit.
Put the double-sided tape on the position
of the battery.
Adhere the copper tape on the drawing path.
- At the position of the battery, peel off the release paper, adhere the negative side copper tape, turn it back and cut it.
- Adhere the copper tape from Chibitronics to the switch.
- Adhere the copper tape from the switch to the battery.
Adhere the red Chibitronics on the mark.
When you move the magnet closer to the
switch, the Chibitronics glow.
Adhere copper tape on the Chibitronics to
reinforce.
Apply the double-sided tape on the washers.
Adhere foam tape around the card base.
Cut the body of the strawberry motif with a craft knife.
Die cut the motifs using the coordinating
die.
Adhere the strawberry motif on the window
frame.
Adhere the sentiment and flower motif using
thin foam tape.
Adhere the cover panel on the card base.
Apply the double-sided tape on the back of
the card base.
Adhere the finished parts on two folded vanilla malt cardstock.
Apply the double-sided tape on the magnet.
I finished it!
When you put butterfly parts on leaves, the
Chibitronics glow.
Be sure to check out the whole video tutorial for more details.
Thank you for stopping by!


I love your videos, thanks so much!!
返信削除