I'm putting cover panel on white cardstock and marking my lights and sentiment strip with a pencil.
Put the batteries and trace the outline with a pencil.
Mark the Chibitronics and the effects sticker.
Open the 1/16 x 7/8 inch slit next to the battery.
Draw the circuit with a pencil.
The first circuit is written in black pencil and second circuit is written in red pencil.
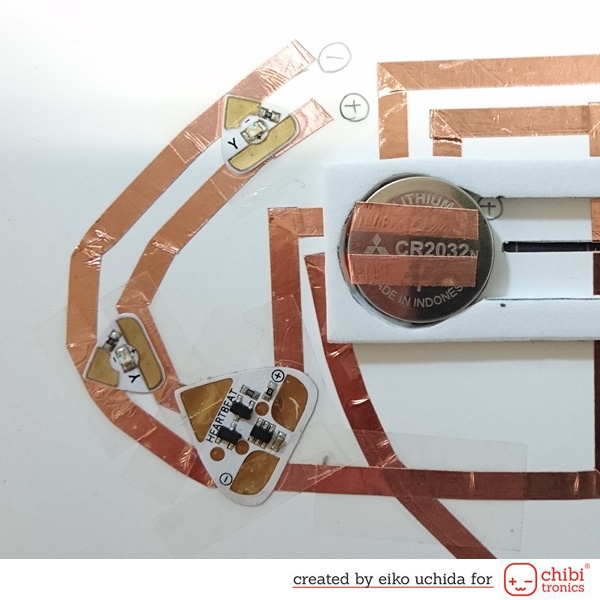
Place an effects sticker between Chibitronics and the battery.
Connect "-" of Chibitronics to "-" pad of the effects sticker and "-" of the battery.
Connect "+" of Chibitronics to signal pad of the effects sticker.
Then connect "+" pad of the effects sticker to "+" of the battery.
Let the minus side of the circuit pass over the slit.
Adhere the copper tape on the red drawing path.
First of all, past the tip of the copper foil tape through the slit, and adhere 1/2 inch on the back side of the card base.
Adhere the copper foil tape to the battery location, cut the copper foil tape as much as 1.5 inches.
Cover with a scotch tape so as not to conduct electricity where the copper tape overlaps.
I'm adhering the copper tape on the black drawing path.
The back side is like this.
Adhere Yellow color Chibitronics LED stickers and an effects sticker.
Make the parts of the switch.
Make two small rectangular parts with white card stock.
The size of the part is 3/4 x 1/2 inch.
Fold rectangular parts in half.
Match the folds of rectangular parts and adhere copper foil tape.
Adhere the copper foil tape around the switch part.
Make cross-shaped parts like this.
In accordance with the width of the copper foil tape of the circuit, also adhere the copper foil tape to the switch part.
The switch part is completed.
Cut the 3 mm thick foam sheet to the same size as the sentiment strip.
Trace outline of battery and pull tab.
Cut along the line.
Adhere the foam sheet on the card base.
Cut the copper foil tape on the minus side of the battery and fold back with the adhesive side up.
Place the battery on the copper foil tape with the positive side up.
Adhere the plus side copper foil tape on the battery.
Fit the switch part into the slit of the card base.
Sliding the switch lights up the LED.
Adhere the pull tab on the switch part with double-sided tape.
Adhere the parts on the back side in the same way.
Adhere the two pull tabs with double-sided foam tape.
Adhere the sentiment strip on the foam sheet.
Adhere the cover plate to the card base with foam tape.
Finally, adhering the cover panel to the black card base.
I'm using a Simon Says Stamp black cardstock.
I finished it!
When I pull the pull tab, the star flashes and the pumpkin glows.
Be sure to check out the whole video tutorial for more details.
Thank you for stopping by!


0 コメント:
コメントを投稿