
Today I make light up Holiday 3D house card using Chibitronics and Waffle Flower Crafts pop-up house die.

At the advanced level, when you pull the
pull tab, the two colors Chibitronics flash alternately.
I'm using these stamps and dies.
"Waffle Flower Crafts Pop-up House Die"
"Waffle Flower Crafts Open Here Stamp Set"
"Lawn Fawn Push Here Stamp Set"
"Taylored Expressions Little Bits Halloween Confetti Die"

~Make the house parts~
(Basic level)
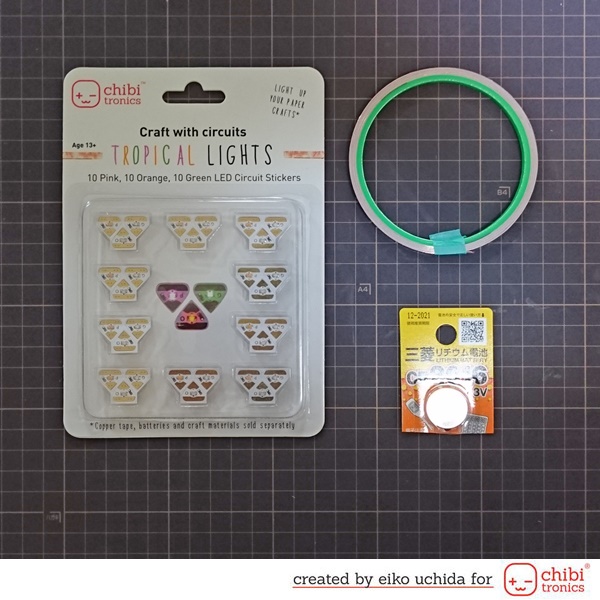
What you need to make a light up card is like this.
"Chibitronics Pink, Orange, Green MegaPack"
"3V coin cell battery" (CR2016)
"5mm wide Copper tape"
I will make the parts referring to the picture below.

- Die cut a black cardstock with roof, chimney and mechanism dies.
- Die cut a purple cardstock with house die.
- Cut a white vellum paper for the house.
- Die cut some decoration parts.
- Pull tab parts (0.5 x 2 inch)
- Switch parts (0.5 x 0.5 inch)
- Die cut house part for the cover page.
(advanced level)
"Chibitronics Red, Yellow, Blue MegaPack"
"Chibitronics Pink, Orange, Green MegaPack"
"Chibitronics circuit stickers effects add-on"
"3V coin cell battery" (CR2016)
"5mm wide Copper tape"

I will make the parts referring to the picture below.

- Die cut a white cardstock with roof, chimney and mechanism dies.
- Die cut a cream cardstock with house die.
- Cut a white vellum paper for the house.
- Die cut some decoration parts.
- Pull tab parts (0.5 x 2 inch)
- Switch parts (0.5 x 0.5 inch)
- Die cut house part for the cover page.
Fold along the crease.

Where there is a plus sign, fold to front.
Where there is no plus sign, fold to back.
Put the house part on the chimney part and
trace the door and windows.

Cut off the doors and the windows.

Cut the lower half of the chimney part to
pass the light.
Adhere vellum paper on the back of the house
parts.
Adhere the decoration parts on the house
parts.

Adhere the two house parts.
Adhere the chimney part on the house part.

Adhere the two house parts.

View from above.

Adhere the mechanism part on the card base.

Mark the base of the house and draw the center line of the base.
(basic level)
Make a hole in the center.

(advanced level)
Make two holes near the center.

~Make the circuit~
(basic level)

- Put the cover panel on black cardstock and mark the lights with a pencil.
- Mark the position of the slit.
- Cut out the 1/32 x 1 inch slit.
- Mark the position of the Chibitronics and the battery.
- Draw the circuit with a pencil.
Adhere the copper tape on the drawing path.

- Adhere the double-sided tape on the position of the battery.
- In the position of the battery, adhere the copper tape on the double-sided tape.
- Place the battery on the copper tape with the positive side up.
- Adhere the positive side copper tape on the battery.
- Adhere the orange Chibitronics on the mark.
Make a switch part.

- Fold square parts in half.
- Insert the switch part into the slit.
- Adhere the copper tape to the same position as the copper tape attached to the circuit paper.
- Pull out the switch part from the slit and adhere the copper tape around the switch part.
- Make cross-shaped parts like this.
Adhere a double-sided tape on the switch
part and adhere the pull tab parts on the switch
part.

Adhere a foam tape around the card base.

(advanced level)

- Put the cover panel on white cardstock and mark the lights with a pencil.
- Mark the position of the slit.
- Cut out the 1/32 x 1 inch slit.
- Mark the position of the Chibitronics, effect sticker and the battery.
- Draw the circuit with a pencil.
- Connect "+" of Chibitronics to "+" pad of the effects sticker and "+" of the battery.
- Connect one "+" of Chibitronics and "-" of another Chibitronics to the signal pad of the effects sticker.
- Connect "-" of Chibitronics to "-" pad of the effects sticker and "-" of the battery.
Adhere the copper tape on the drawing path.

- Adhere the double-sided tape on the position of the battery.
- In the position of the battery, adhere the copper tape on the double-sided tape.
- Place the battery on the copper tape with the positive side up.
- Adhere the positive side copper tape on the battery.
- Adhere the red and green Chibitronics and effect sticker on the mark.
Like the basic level, make switch parts.
Adhere a double-sided tape on the switch part and adhere the pull tab parts on the switch part.

Adhere a foam tape around the card base.
~Assemble the card~
Adhere the house part on the mechanism
part.

Put the chimney in the hole of the roof.

~Make the cover page~
Make house part for the cover page.

Adhere vellum paper on the back of the
house part.
Adhere the decoration parts on the house
part.

Stamp the sentiment using Versamark.
Heat embossing with gold embossing powder.

Adhere the cover page on the card base.

I finished it!

At the basic level, when you pull the pull tab, one Chibitronics glows.
At the advanced level, when you pull the pull tab, the two colors Chibitronics flash alternately.
Be sure to check out the whole video tutorial for more details.
Be sure to check out the whole video tutorial for more details.
Thank you for stopping by!


0 コメント:
コメントを投稿