
Today I make light up shaker frame card.

The stamps and dies I used are here.
"Dotted patterns Set 1 Creative Dies / SSS"
"Brush Stroke Stripes / SSS"
"Mini Thank You / SSS"

What you need to make a light up card is like this.
"Chibitronics Red, Yellow, and Blue LED Sticker Pack"
"3V coin cell battery"(CR2025)
"5mm wide Copper tape"

The used cardstocks are here.
"Neenah 80lb smooth solar white card stock"
"Bazzill Robin's egg cardstock"
"Darice Foamies® Foam Sheet White 2mm thick"
"Hot off the press Heat Resistant Acetate"
"DCWV Foiled Cardstock stack"

The used inks and embellishments are here.
"Tsukineko memento tuxedo black"
"Rocky Shore Crisp Dye Ink / SSS"
"Crystal Rainbow Fusion / SSS"
"Sparkling Crystals Mix / SSS"

I will make the parts referring to the picture below.

Upper left:White cardstock for circuits.
Upper middle:Stamping Brush Stroke Stripes stamp with Rocky Shore ink and die cutting with two frame dies and one circle die.
Upper right:Die cutting a white cardstock with a circle die and stamping thank you sentiment stamp with tsukineko memento tuxedo black ink.
Die cutting a gold foil cardstock with a ribbon die.
Cutting an acetate sheet about 2.5 inch square.
Lower:Die cutting a 2mm thick foam sheet with two frame dies and one circle die.
I'm putting stripe cardstock on white cardstock and marking my lights and switch with a pencil.

Tracing the circle with a pencil.
I'm marking the switch position of the ribbon.

Place six chibitronics around the frame.
Use a protractor to mark each 60 degrees.


I'm using a small rectangular paper to make switch and drawing the circuit with a pencil.

I'm adhering the copper tape on the drawing path.

I'm adhering six yellow Chibitronics LED stickers.
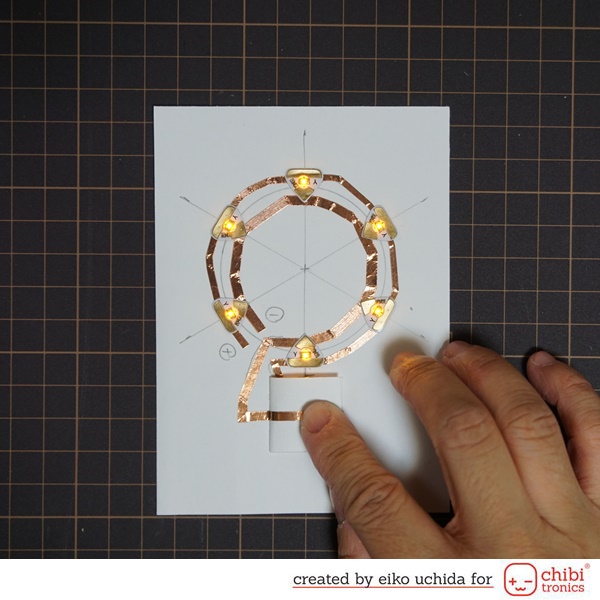
Adhering the circle part inside.

Adhering so that the glowing part of Chibitronics comes close to the circle line.

Cutting the switch part of the foam sheet with a craft knife.

For one of the form sheets, make a notch at the glowing part of Chibitronics.

Adhering the notched foam sheet and foam frame on the card base.

When I close the switch, the LED turn on.

Adhering another foam sheet and a stripe cardstock.

Putting sequin and acrylic stone and adhering an acetate sheet.

Adhering a stripe cardstock and a ribbon part.
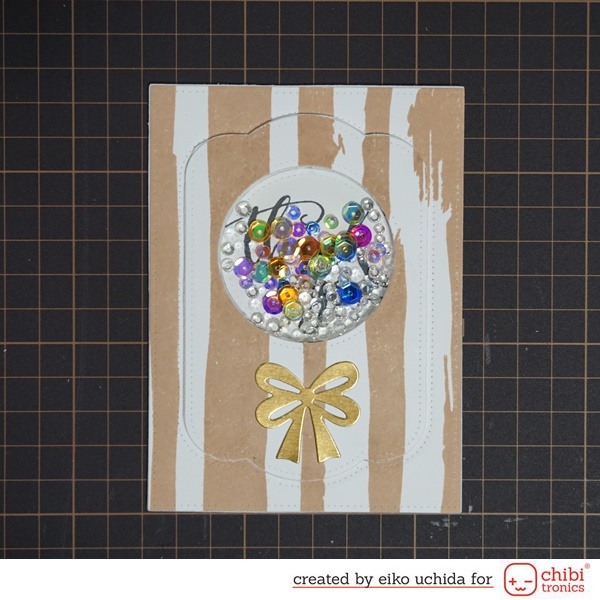
Finally, adhering the cover panel to the card base.
I'm using a Bazzill Robin's egg cardstock.
I finished it!
Be sure to check out the whole video tutorial for more details.
Thank you for stopping by!


0 コメント:
コメントを投稿