
Today I make Newton's Halloween card.

This card contains two kinds of circuits, so the star flashes and the pumpkin doesn't flash.
The stamps and stencils I used are here.
"Starfield Stencil / SSS"


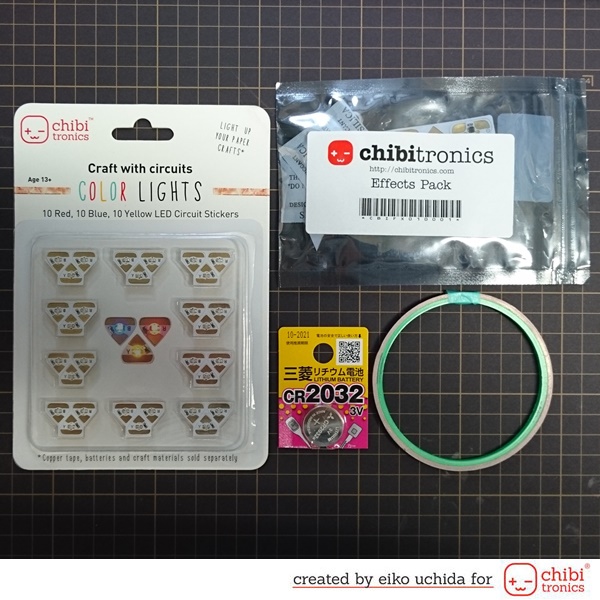
What you need to make a light up card is like this.
"Chibitronics Red, Yellow, and Blue LED Sticker Pack"
"Effects stickers"
"3V coin cell battery"(CR2032)
"5mm wide Copper tape"
The used cardstocks are here.
"Neenah 80lb smooth solar white card stock"
"Simon Says Stamp black cardstock"
"Darice Foamies® Foam Sheet White 3mm thick"
"White vellum paper"

The used inks and markers are here.
"Tsukineko memento tuxedo black"
"Copic sketch markers E51 E31 E33 E35 YR02 YR04 YR07 Y15"

"Distress Oxide black soot"
"Distress Oxide seedless preserves"
"Distress Oxide wilted violet"
"Artist's Loft Fundamentals Watercolor Pan Set"

"Tsukineko Versamark Emboss Ink Pad"
"Heroarts White embossing powder"

"Texture Paste Opaque Matte"

Die cut a black cardstock with a large postage stamp frame die and two kinds of grassy border dies.

I'm coloring a white cardstock with three colors distress oxide inks.

First of all I'm using seedless preserves and wilted violet inks.
Next I'm using black soot ink.

With the white water color, add ink splatter across the card.

Stamp and white emboss the sentiments onto black cardstock.

The size of the pull tab is 1/2 x 1 5/8 inches, and the size of sentiment strip is 1 x 2 inches.
Cut the corner of the pull tab with a 1/8-inch corner chomper.
Stamp the pumpkin and Newton stamp using Tsukineko Memento Tuxedo Black and coloring with copics.

Cut the pumpkin eyes and mouth with a craft knife, and cut out the outline.

Place pumpkin, grassy border and sentiment strip onto the background.

Mark the place of sentiment strip with a pencil.
Place stencil over card base, and mark the large stars.

Make two holes at the mark.

The hole size is 1/8 inch.
Adhere the transparent sheet from the back of the card base.

Place the stencil over card base.

Mix embossing paste and Y15 copic.

Apply embossing paste using palette knife.

Remove the stencil slowly.

Mark the parts that overlap with the outline of the pumpkin.

Cut 1mm inside of the mark.

Mark the pumpkin's face and cut out with a craft knife.

Adhere vellum paper on the back of the card stock.

Cut the outline of sentiment strip.
Adhere grassy border and pumpkin onto the card base using adhesive runner.

Adhere another grassy border using foam adhesive tape.

Adhere postage stamp frame using foam adhesive tape.

The cover panel was completed.
Continue to second part.
"Chibitronics Red, Yellow, and Blue LED Sticker Pack"
"Effects stickers"
"3V coin cell battery"(CR2032)
"5mm wide Copper tape"
The used cardstocks are here.
"Neenah 80lb smooth solar white card stock"
"Simon Says Stamp black cardstock"
"Darice Foamies® Foam Sheet White 3mm thick"
"White vellum paper"
The used inks and markers are here.
"Tsukineko memento tuxedo black"
"Copic sketch markers E51 E31 E33 E35 YR02 YR04 YR07 Y15"
"Distress Oxide black soot"
"Distress Oxide seedless preserves"
"Distress Oxide wilted violet"
"Artist's Loft Fundamentals Watercolor Pan Set"
"Tsukineko Versamark Emboss Ink Pad"
"Heroarts White embossing powder"
"Texture Paste Opaque Matte"
Die cut a black cardstock with a large postage stamp frame die and two kinds of grassy border dies.
I'm coloring a white cardstock with three colors distress oxide inks.
First of all I'm using seedless preserves and wilted violet inks.
Next I'm using black soot ink.
With the white water color, add ink splatter across the card.
Stamp and white emboss the sentiments onto black cardstock.
The size of the pull tab is 1/2 x 1 5/8 inches, and the size of sentiment strip is 1 x 2 inches.
Cut the corner of the pull tab with a 1/8-inch corner chomper.
Stamp the pumpkin and Newton stamp using Tsukineko Memento Tuxedo Black and coloring with copics.
Cut the pumpkin eyes and mouth with a craft knife, and cut out the outline.
Place pumpkin, grassy border and sentiment strip onto the background.
Mark the place of sentiment strip with a pencil.
Place stencil over card base, and mark the large stars.
Make two holes at the mark.
The hole size is 1/8 inch.
Adhere the transparent sheet from the back of the card base.
Place the stencil over card base.
Mix embossing paste and Y15 copic.
Apply embossing paste using palette knife.
Remove the stencil slowly.
Mark the parts that overlap with the outline of the pumpkin.
Cut 1mm inside of the mark.
Adhere vellum paper on the back of the card stock.
Cut the outline of sentiment strip.
Adhere grassy border and pumpkin onto the card base using adhesive runner.
Adhere another grassy border using foam adhesive tape.
Adhere postage stamp frame using foam adhesive tape.
The cover panel was completed.
Continue to second part.


0 コメント:
コメントを投稿